Get Started with APRS with RTLSDR and Xastir on Mac
Table of Contents
Recently, a good friend of mine discovered the joys of amateur radio and, knowing that I’m a licensed ham, started asking questions. I haven’t touched a radio in years, but an itch that needed scratching awakened in me.
Radio has always been magical to me: hyperlocal (mostly), unpredictable operating conditions, and harnessing nature’s power just to chat. Having been raised on the Internet, I’m not one for voice communication, so I’ve been exploring the digital amateur radio modes.
APRS (Automated Packet Reporting System) is one such mode and is used for reporting real-time data, such as the GPS coordinates of a mobile station.
APRS is also one of the more accessible modes to get started with, even without being a licensed amateur radio operator. Without being licensed, you can:
- See the locations of mobile stations on the move
- See the locations of fixed stations forwarding data to the Internet (iGates)
- Forward packets that you pick up to the Internet
If you visit APRS.fi, you can see all the stations and information that volunteer iGate operators are passing from the air to the Internet.
Thanks to the explosion of RTLSDRs, getting started with a digital mode like APRS is cheaper than ever. Any RTL-SDR and antenna should work, but I personally use the Nooelec NESDR Smart v4 (ref link).
In this article, you will learn how to use a low-cost RTLSDR radio along with the open-source Xastir software to listen to APRS communications around you and to link what you hear to the Internet, turning your station into an iGate.
Installation#
Installation of Xastir on MacOS requires a few steps:
- Installing the prerequisites
- Getting the Xastir source code
- Configuring the build
- Building the code
Now, this sounds daunting, but this guide and some additional resources will help you through any problems that may come up.
Installing the Prerequisites#
These instructions are slightly modified from the official Xastir documentation.
The first things you’ll need to install or make sure you have installed are:
- XCode
- Homebrew
- XQuartz
Installing XCode and Homebrew, if you haven’t already, just takes two shell commands:
xcode-select --install/bin/bash -c "$(curl -fsSL https://raw.githubusercontent.com/Homebrew/install/HEAD/install.sh)"
XQuartz comes next, which allows you to run X11 Windowing System applications on MacOS. That can be installed from a DMG file on their website.
After installing these, you’ll need to install the toolchain needed to build Xastir as well as the rtsldr and socat software. This can be done via Homebrew in a single command:
$ brew install gcc openmotif graphicsmagick pcre shapelib libgeotiff proj curl berkeley-db@4 git autoconf automake socat librtlsdr
Next, you’ll install multimon-ng, which will automatically decode the APRS signal (among others, like POCSAG) for you.
Installing multimon-ng#
Installing multimon-ng will be good practice for installing Xastir, as it also requires you to clone down the Git repository and build the application from source. The following commands will pull down the code, build it, and install it:
$ git clone https://github.com/EliasOenal/multimon-ng
$ cd multimon-ng
$ mkdir build
$ cd build
$ cmake ..
$ make
$ sudo make install
Getting the Xastir Source Code#
If you’re familiar with Git, then this should be pretty straightforward for you. If not, don’t worry because pulling down external code with Git is a single command and should work out of the box. Navigate to where you want to put the Xastir code, then run: git clone https://github.com/Xastir/Xastir.git
This will put the source code into the Xastir directory within your current working directory. Move into the Xastir directory and run the boostrap script:
$ cd Xastir
$ ./boostrap.sh
Configuring the Xastir Build#
The following commands will create a build directory and set up flags that will allow you to have online map caching available:
$ mkdir -p build
$ cd build
$ ../configure CPPFLAGS="-I/usr/local/opt/berkeley-db@4/include" LDFLAGS="-L/usr/local/opt/berkeley-db@4/lib"
Building Xastir#
Next, run make and then sudo make install to build the code and install it. You can verify that all has worked thus far by running xastir & which will launch XQuartz and Xastir itself.
You’ve just installed a number of tools and utilities to help you not only use Xastir to map reported APRS positions, but to receive the radio signal from your RTLSDR and decode it for Xastir’s use. Before you begin using Xastir, you’ll have to configure it and the supporting cast of tools.
Configuring Your Tools#
In this section, you will set Xastir up to connect to your SDR, connect it to your callsign, and connect it to APRS server interfaces.
Configuring Xastir#
The very first thing will be to open your command prompt and run callpass CALLSIGN where CALLSIGN is your ham radio callsign. This will generate a password for you, write it down or otherwise store it for later.
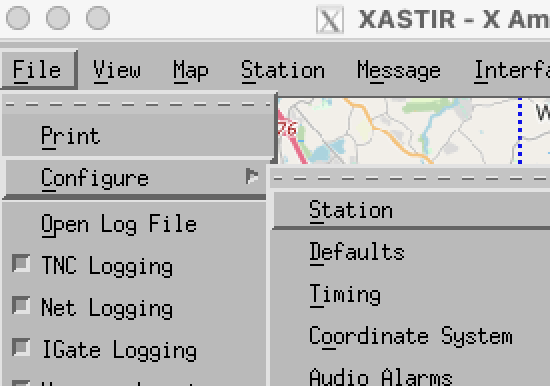
Launch Xastir with xastir & if you don’t have it running already. Open the Configuration menu as shown below:
Open the Station menu and fill in your callsign and and GPS coordinates, along with any comments you want to attach to your station.
Next, open the Defaults menu. Under the IGate Options heading, select “Allow RF to Inet traffic ONLY.” If you have a transmit-capable radio, you can allow two-way traffic instead, but that is beyond the scope of this article.

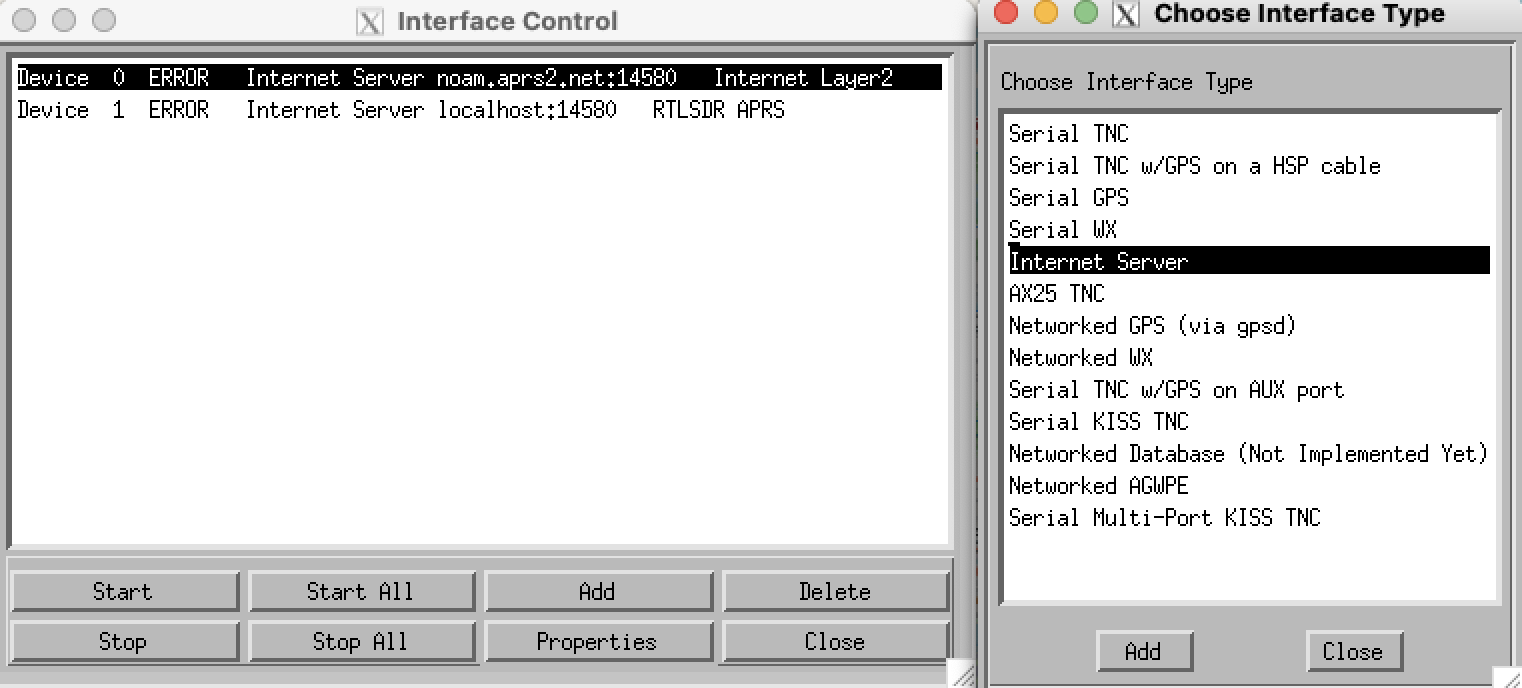
Next, open the Interface dropdown menu and select Interface Control. In this window, you will set up connections to your RTLSDR and an APRS Internet server.
In the window that opens, click “Add.” This will open another small window where you will select your interface. First, you will set up your RTLSDR connection by selecting “Internet Server”:
In the window that pops up, enable “Activate on Startup,” type “localhost” in the Host field, set the port to 14580, and add something like “RTLSDR APRS” in the Comment field to help identify the interface:
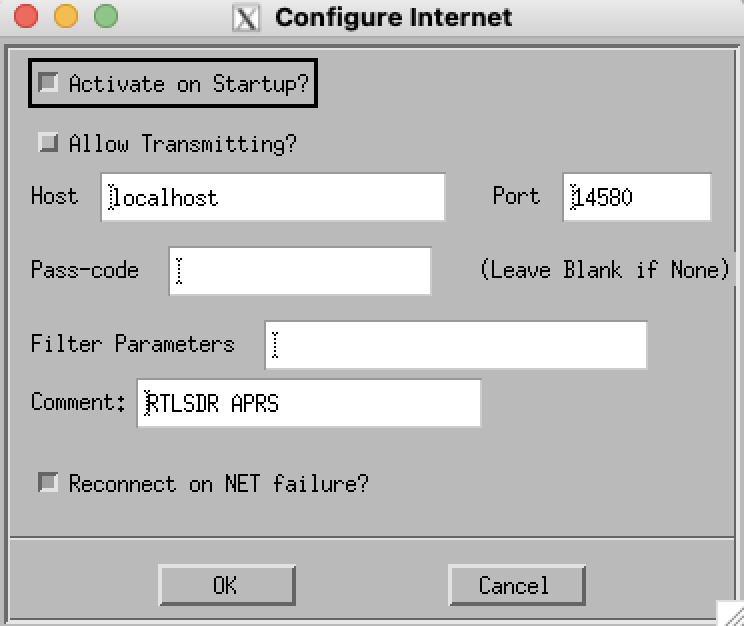
This may seem mysterious, but what this does is connect to a local server that you’ll set up next that sends Xastir the appropriate APRS packets from your radio.
Next, set up another Internet interface, but this time enable “Activate on Startup” and “Allow Transmitting.” For the host, enter “noam.aprs2.net,” set the port to 14580, and enter the password that you noted from running callpass.
You can leave the Filter Parameter field as it is, and add another comment like “Internet Layer2” to label the interface:

You just set up an authenticated connection to an APRS server that will allow users of APRS.fi to see stations that you reported.
Configuring Your Local Server#
Now that you’ve configured Xastir, you’ll make use of rtl_fm and multimon-ng to create a local server that analyzes the incoming data from your SDR and sends APRS packets to Xastir.
This is done with one command that you’ll need to run every time you start an APRS session:
$ rtl_fm -f 144390000 -s 22050 -o 4 -g 100 - | multimon-ng -a AFSK1200 -A -t raw - | sed -u -r 's/^.{6}//' | socat -u STDIN TCP-LISTEN:14580,reuseaddr,fork
With this command, you use rtl_fm to direct your SDR to listen to 144.390 MHz (the APRS frequency for the US) with a sample rate of 22.050k, an oversmapling level of 4, and a tuner gain of 100. The final parameter - directs rtl_fm to dump samples to stdout. Feel free to experiment with these settings as needed.
The output is then piped to multimon-ng, which decodes the incoming signals with AFSK1200, is set to APRS mode with -A, and is set to output in raw mode with -t raw. Again, output is directed to stdout with -.
That is then piped to sed which parses the data stream with a substitution that removes the first 6 characters of the incoming data. That’s then piped to socat, which relays data from stdin to port 14580.
Since this is a complex command, you should use your shell’s rc file (such as .bashrc for bash, .zshrc for zsh, etc.) to set up a simple alias for it like start_aprs.
Use#
Now that you’ve done your setup, whenever you want to start relaying APRS packets to the Internet, do the following steps:
- Connect your SDR to your computer
- Run
rtl_fm -f 144390000 -s 22050 -o 4 -g 100 - | multimon-ng -a AFSK1200 -A -t raw - | sed -u -r 's/^.{6}//' | socat -u STDIN TCP-LISTEN:14580,reuseaddr,forkor the alias you set up for it - Run
xastir &to launch Xastir
You should now see a map centered on your station’s location and, hopefully, local APRS users around you.
Speedrun#
Here’s a quick reference guide reduced to an untested shell script and simplified instructions to use as a reference:
# Install xcode and brew, if needed
xcode-select --install
/bin/bash -c "$(curl -fsSL https://raw.githubusercontent.com/Homebrew/install/HEAD/install.sh)"
# Download prerequisites
brew install gcc openmotif graphicsmagick pcre shapelib libgeotiff proj curl berkeley-db@4 git autoconf automake socat librtlsdr
# Install multimon-ng
git clone https://github.com/EliasOenal/multimon-ng
cd multimon-ng
mkdir build
cd build
cmake ..
make
sudo make install
cd ../..
# Install Xastir
cd Xastir
./boostrap.sh
mkdir -p build
cd build
../configure CPPFLAGS="-I/usr/local/opt/berkeley-db@4/include" LDFLAGS="-L/usr/local/opt/berkeley-db@4/lib"
make
sudo make install
- Check that Xastir is installed properly with
xastir & - Run
callpass CALLSIGNwith your callsign and note the password that’s generated - In Xastir:
- File > Configure > Station and add your call sign and GPS coordinates
- File > Configure > Defaults and select “Allow RF to Inet Traffic ONLY”
- Interface > Interface Control > Add > Internet
-
- Run
rtl_fm -f 144390000 -s 22050 -o 4 -g 100 - | multimon-ng -a AFSK1200 -A -t raw - | sed -u -r 's/^.{6}//' | socat -u STDIN TCP-LISTEN:14580,reuseaddr,forkto start your SDR and send incoming data to Xastir.
Additional Resources#
- Installing Xastir with Homebrew was the original source of the installation instructions and is still correct as of this writing.